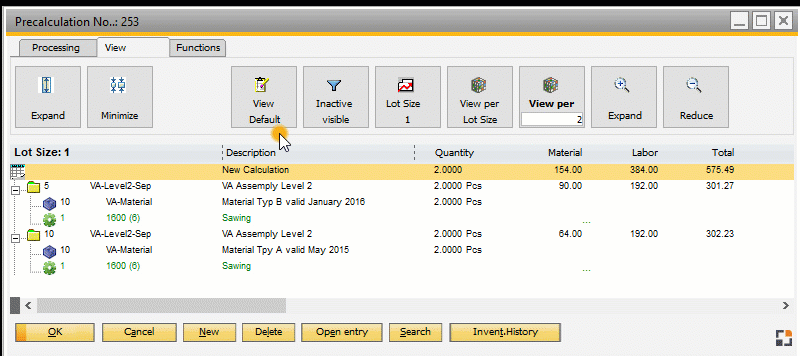
Toggle between standard and extended view. Function is only available if "calculation schema per assembly" has been activated in the calculation schema.
The default view displays standard calculation without showing additional costs.
The extended view displays the results that were deposited in the calculation schema in the "View" tab. For more information seePre-calculation Extended view.
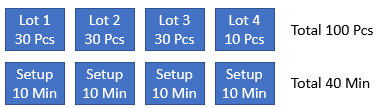
Example: Production 40 Pcs, Lot size 30 Pcs
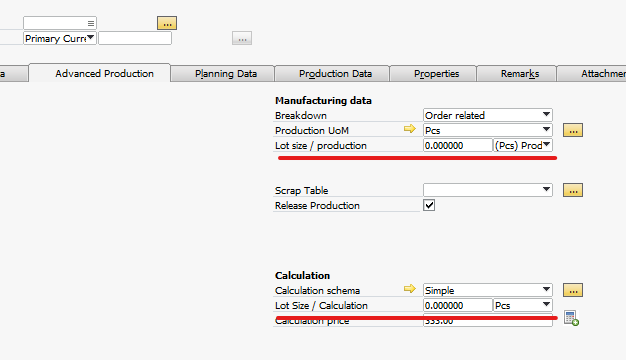
Sub assembly is order related, Production lot size = 0 Pcs (no lot size)
In this case we working work order position related.
If order related sub assembly has own lot size, the system check this too - but always per production level from father item
Example : Lot size 20 Pcs
In this case the setup time will be multiplicated with 4 in the sub assembly
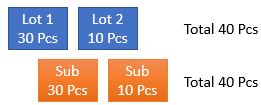
2. Example for order related sub assembly:
-
Main and Subitem are order related, the lotsize of the main item is 50
-
We need the subassembly 2 times per main item, the lotsize of the Subitem is 90
-
We want to produce 140 Units of the main item
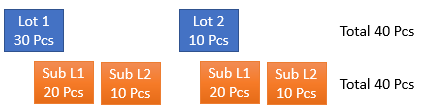
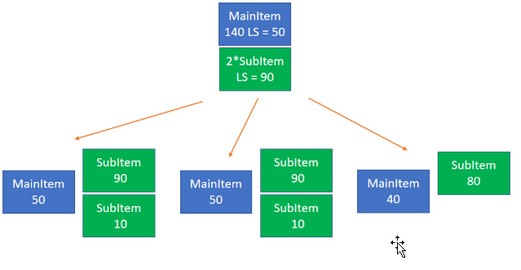
Result:
-
We need to produce 3 lots for Mainitem (50 + 50 + 40)
-
For the first and second lot of the mainitem we need 2 lots of the subitem (90 + 10)
-
For the last lot of the mainitem we need 1 lot of the subitem (80)
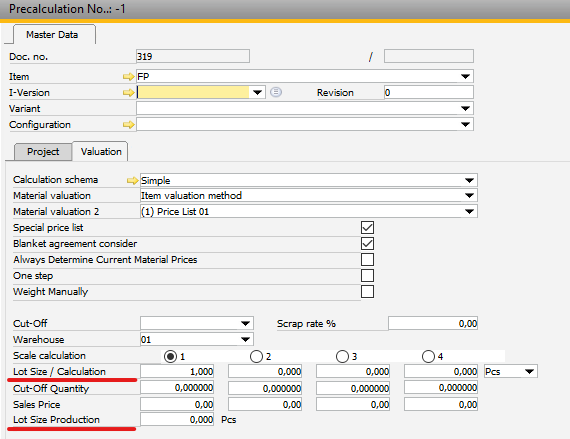
Stock related
if Sub assembly is stock related, then the sub assembly ignore the lot size from father assembly
if stock related sub assembly has own lot size, then the system use it without relation of lot size of father item.
Note: This is working differently than in Beas 2020.11 or older. If you need the old functionality, you can change this in a user event. SeeScript documentation.
Note: If you activate "Consider Lot size production", the calculation in MRP can take longer.
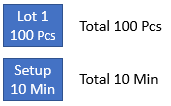
Working with Lots size
Calculation
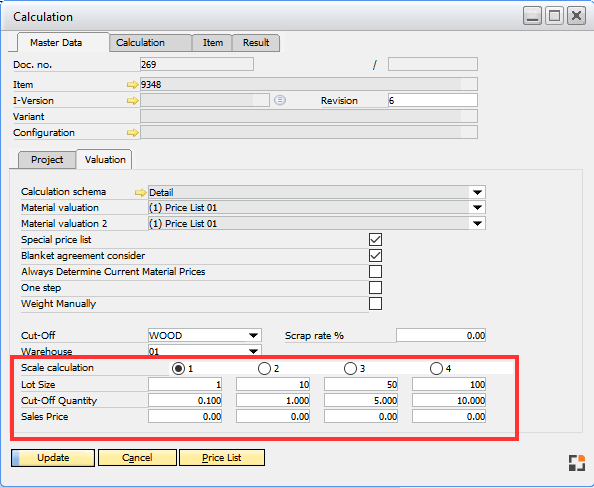
A calculation can be calculated simultaneously in a maximum of 4 lot sizes. The default lot size is the calculation lot size as per the item master - Calculation.
If the calculation is called up from a quotation or an order, the quantity stored there is the lot size.
This is the maximum individual quantity that can be produced without interruption.
View per
With "View per" you can define, for which count you want to see the price.
Example 1:
You must create a quotation for 1, 10, 50 and 100 and need the price per 1.
1. Define Lot size 1,10, 50 and 100
2. Define View per to 1
Now you can display the cost per 1 for different quantities.
Example 2:
You have a max. lot size for 100 Pcs and must create a quotation for 1000 Pcs and you need the total price for 1000
1. Define Lot size 100
2. Define View per to 1000
Now you can the the total costs for 1000
In this case the system multiplicity the setup times, fix times and fix surcharges with 10, because you must produce this product 10 times to deliver 1000 Pcs.
Switching between lot sizes and view
Change Lot size
- in calculation view on text "Lotsize" (1)
- in tab "view" - Lotsize (2)
Change View
In tab "view" click on
- (3) "View per Lot size": display always total costs by lot size
- (4) "View per x": you can insert the count of Pcs, for which you see the price, example "1" means: Display the price per Pcs.
If the subassembly has a lot size, too, this will be considered under following conditions:
Note: Beas only supports price list with numbers 1–99. Price lists with internal id > 99 are not supported.
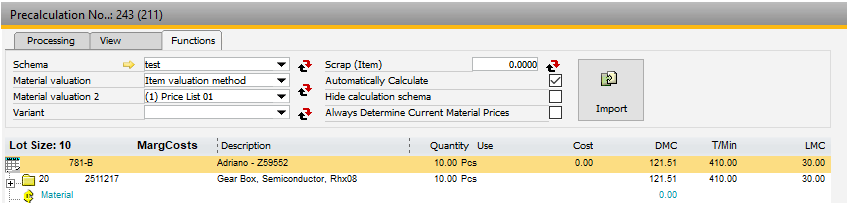
Material valuation 2
Second valuation method in case the first one does not return a price. If there is still no price determined, the row is marked red and a warning message is issued. SeeConfiguration wizard – Precalculationbeas9.0-000-003-010
If the Configuration Wizard – Master Data – Item – Variantper item is disabled and below this setting under "Variant" a calculation schema or alternative pricing is stored, then changing the variant in the calculation, the calculation schema and valuation may also be changed.
Scrap (Item)
There you can change the scrap for all items.
Automatically calculate
If this option is disabled, no automatic calculation will be performed when something is changed in the calculation. In this case, the re-calculation can be started manually. (Tab Edit > button Calculate)
Hide calculation schema
If this check box is selected, the calculation schema is hidden.
If active, the material price and the price for external service are always determined using the current price list. The setting is applied from calculation schema.
Note: The current determination of the prices takes a lot of time. For this reason, the calculation does not start automatically. For this you have to click the button "Calculate" after a change.
Imports BOM and routing positions from a simple text file.
Setup of the import file:
Corresponds a CSV format
Column separator:Char 9 (Tab)
Row separator: Char 13+ Char 10 (CrLf)
The columns are independent from the line types. The line type will be defined in the first column. The line type "BOM position" will be used if no line type is stored.
BOM:
Linetyp = B <char 9> ItemCode <char 9> Quantity
Or
ItemCode <char 9> Quantity
Routing position Linetyp = O <char 9> RoutingId <char 9> SetupTime <char 9> WorkingTime
Click to select a text file in following format: Item (Tab) Quantity (linefeed) Item (Tab) Quantity.
(Tab) = Ascii-character "9" (linefeed) = Ascii-character 13 and 10.
Note: BOM items are inserted to the current position. If the cursor is on an assembly, the BOM is inserted to that assembly. If the cursor is on a BOM item, imported items are inserted before that position.
After import, the complete calculation BOM is renumbered and prices are read in again according to the set up pricing.
If an assembly is stored in the import file, the assembly is broken down during import. If an item was not created before it is imported nevertheless.
For each material position, multiple operations can be defined.
The existing routings will be removed and the new ones will be inserted after the selection.
Update: If change were made in the calculation, the text changes to "update". Clicking on it, everything is completely recalculated and saved - even if the automatic calculation is turned off. Then the text will be reset to "OK"
Exception: if the calculation is called from the item master page, this button is hidden.
Cancel
Leave the calculation.
New
Insert New Object - depending on the current position.
NEW:
In the surcharge area an object can only be inserted if it was enabled by the current calculation schema.If the first row selected, this button has no function.
Delete
See above: Edit tab – delete.
Open entry
Open the current entry for editing.
Select the first line for editing details.
Search
Full text search over the entire calculation.
Invent.History
Opens the inventory history for the selected item.