|
Available with Production Data Collection, Start, Interrupt, Completion, Finished Goods, Scrap license.
See Terminal settings in Configuration wizard.
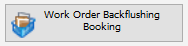
Clicking on this app will open the Work Order Backflushing issue window.
Window fert_retrograd_abbuchen.psr
With this function you can create a receipt for the finished goods item and backflush all necessary materials.
For this you only need:
- Bar code of the work order position
- Quantity
PATH: Production > Factory data capture > Work Order Backflushing Booking
fert_retrograd_abbuchen
Backflushing is used to automatically remove material that is allocated to a work order and is marked as "backflush". The work order is selected for this (alternatively, the routing slip bar code can be scanned). Then, you specify the total quantity to be reported and the yield to be received. After inputting the number of units, the corresponding quantity of materials is issued and the finished good is entered.
The material is issued from the inventory location stored in the BoM and the primary item inventory, respectively. If an inventory location is specified for "Issue from storage location", the material is posted from this inventory location.
WMS Integration: Produmex WMS Batch attributes are supported.
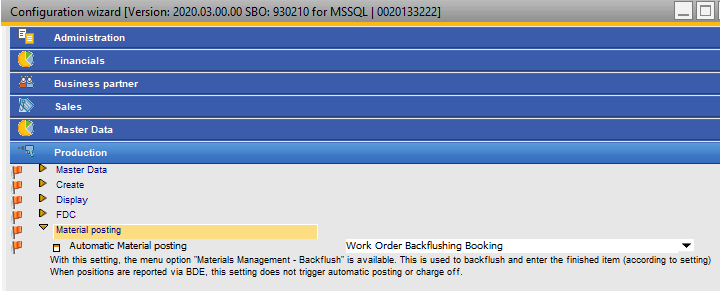
You can use this window only if this window is activated in the Configuration wizard.
In the Configuration wizard you must activate Production > Material posting: Work Order Backflushing Booking
Note:
It is not possible to use this window in parallel to the backflushing functionality on the last/first routing position!
In Configuration Wizard > Production > Material posting > Backflushing you can define all additional Backflushing options.
The "Exceeding planned quantity allowed" Configuration parameter affects WO material backflushing: Minimum/Maximum values are related to receipt quantity.
Setup: Configuration > Production > Work Order Backflushing Booking
These settings affect the following functions:
- Desktop version Work order backflushing
- WebApp WO Backflushing
- Manual receipt window.
They are visible only if in Configuration wizard > Production > Material posting > Material posting automatically at "Work order backflushing" was selected.
PATH: Administration > System Initialization > Configuration wizard > Production.
Parameters
|
|
|
Selection warehouse location issue
Selection warehouse location at receipt
|
Standard: use default warehouse defined in work order or in issue process related to issue rules.
If you activate this setting, the user as additional fields: "Issue from warehouse" and "Enter to stock"
Note for receipt: If the receipt warehouse is changed, problems may arise with the WIP account. That is why this option should not be activated when working with different warehouse-dependent WIP accounts.
|
|
Book times automatically
|
If this option is activated, the times are also automatically booked in the backflushing process.
This function is available in
Work order backflushing
WebApp WO Backflushing
Manual receipt for work order (only if ".. to employee" is defined !)
It creates time receipts for the following routing position:
- Clock mandatory is activated
- Routing position is active
- Duration time is defined
- Routing position - Extended - "Block login" is disabled.
The default time is computed as follows:
First confirmation: (planned processing time per unit * reported quantity) + setup time
Second confirmation: (planned processing time per unit * reported quantity)

Setup Time: field "Setting up Capacity"
Planned processing time: field "Processing"
For correct calculation, the system checks Quantity per, Time Unit, Use factor and Work steps.
"Personnel", "Quality Control"
Parallel resources are supported.
Fix times (Quantity per time=-1): The system calculates Processing time / reported quantity
Only Cost type for processing is supported.
Master Slave settings are ignored. The system creates the time receipt for all routing positions.
Quality control orders in Routing positions are supported.
Start/End Date for time receipt is Current or the Date defined in the receipt/backflushing window.
Employee in time receipts is the currently logged in employee. For more information see setting "..to employee no" below.
ALTERNATIVE METHOD
As an alternative, use the option in Configuration wizard > Calculation > Post-calculation > "Plan=Actual if no time receipts", or use the valuation method in Configuration wizard > Production > Valuation and Posting of assembly - Valuation - planned costs.
|
|
... To employee no
|
Only displayed if option above "Enter times automatically" was enabled.
Define t the employee number can be entered here for automated booking, if no employee is connected.
Terminal / WEB APP: The system use always the current logged in Employee and ignore this setting
Beas Desktop: If an Employee is linked to current use, it use the linked Employee, otherwise this setting.
|
see Material posting, backflushing
|
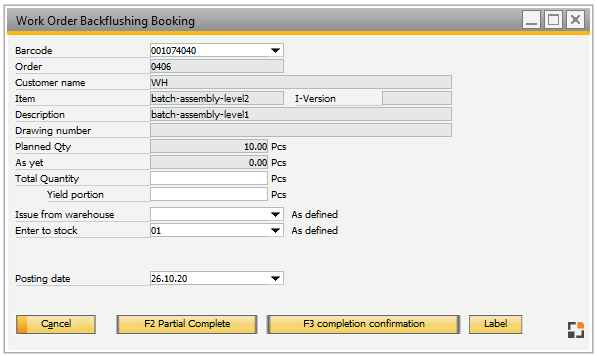
The posting process without closing the WO is done via button "Partial posting" or clicking on F2.
The posting process with closing the WO position or WO is done via button "Final posting" or clicking on F3.
Completion confirmation – Button only visible if
a) There are no uncleared time records.
b) It is not about an overhead costs-order (definable in production type).
c) Configuration wizard > Production > Valuation and posting of the assembly > Post finished parts when is not set to manually.
d) The variable "lb_cannotclose" is not set to 1 in windowevent "cancloseorder".
Example script: General hide of button "Completion confirmation"
windowevent cancloseorder
setvar=lb_cannotclose=1
end event
|
For items, set to "backflushing", quantities to be posted are automatically pre-allocated. Other entries are not pre-allocated.
Batches and serial numbers are only pre-allocated automatically, if in Configuration wizard > Production > Material posting and reservation > Backflushing > "Post batches also" or "Post serial numbers" has been enabled. Click on "pre-allocate" to pre-allocate batches or serial numbers manually. If batches or serial numbers has been reserved, independent of settings, these are always pre-allocated automatically.
Order of withdrawal is defined as:
1. Reserved goods
2. Allocation warehouse
3. Standard warehouse (as per BOM item or standard warehouse of item)
4. BoM definition, Bin location (when bin location is defined)
5. Within this order the withdrawal rules from Configuration wizard > Production > Material posting and reservation > "Automatic batch issue by ..." apply.
All other warehouses are not considered, but you can withdraw manually from these warehouses.
|
This window can be accessed from the menu as well as from the terminal.
|
|
|
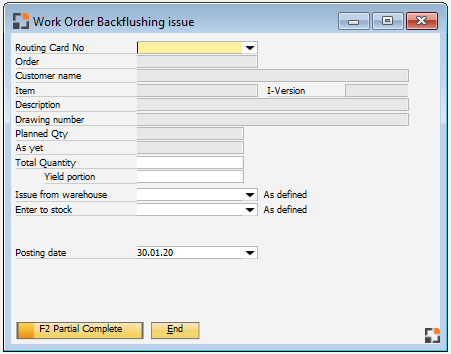
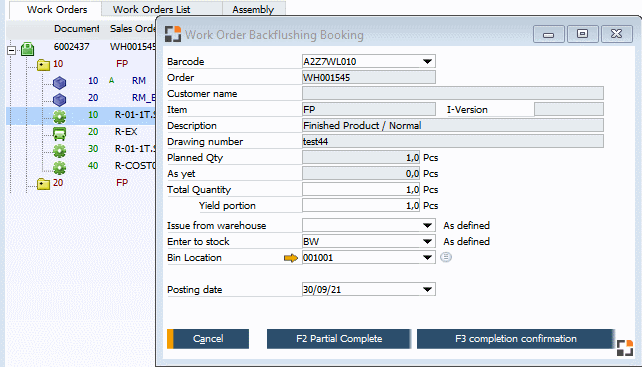
Bar code
|
Drop-down selection. Displayed: routing card no, bar code, order, item, item description, customer name.
|
Order
|
Order number from Work order.
|
Customer name
|
Customer name.
|
Item
|
Item.
|
I-Version
|
Item version (with activated item version control).
|
Description
|
Free Text.
|
Drawing number
|
Drawing number.
|
Planned Qty
|
Planned Qty from work order. Display in Inventory UoM.
|
As yet
|
Confirmed until now. Entry in Inventory UoM.
|
Total Qty
|
Total reported qty of the current time receipt.
|
Yield portion
|
Yield portion of the total reported quantity.
|
Issue from warehouse
|
This field is only displayed if activated in Configuration wizard - Production > production backflushing > Warehouse selection for issue
If active, this warehouse is used for issue. This has a higher priority than the default warehouse in BoM.
|
|
Enter to stock
|
This field is only displayed if activated in Configuration wizard > Production > production backflushing > Warehouse selection for issue
By default, the assembly is posted to the warehouse, given in work order item.
See Warehouse rules.
NOTE: Changing this warehouse with warehouse depending account determination active can lead to differences on the WIP account.
|
|
Bin Location
|
Only visible if the receipt warehouse is a bin managed warehouse.
Here you can define the bin location for the assembly.
See Warehouse rules.
Beas supports WMS, Beas, and SAP Business One Bin Management (Beas 9.3 PL3)
The field has the following components:
Arrow icon  / / 
List of all bins where the item is located.
Selection (Drop-down)
A list opens to select the desired bin location.
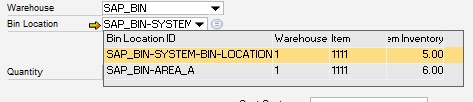
The selected drop-down option displays the following information in receipt documents:
•Bin Location
•Warehouse Area
•First item in this bin location
•Stock of the first item in this bin location
The list can be modified in the Configuration wizard.
The selected drop-down option displays the following information in issue documents:
•All stock information of all bin locations with batch- and serial number information.
• Reserved Batch quantities information Reserved Batch quantities information

The drop-down contains information on reserved quantities in 3 columns:

The batch entry in the list is displayed in RED color if the Batch is not free.
Quantity-related information:
Field
|
Description
|
Available
|
Available quantity is = Inventory - reserved quantity + reserved quantity for current work order position.
This quantity is displayed in GREEN, if quantity is reserved for the currently used Bill of Materials position.
WMS integration: Goods issue > This field also considers all units available for WMS lock types Batch, LUID and Detail.
|
Reserved for BoM
|
Reserved Quantity for this BoM Position
|
Reserved Quantity
|
Total reserved Quantity
WMS integration: Goods issue > This field also considers all WMS reservations for locking types Batch, LUID and Detail.
|
Inventory
|
Stock batch quantity in the bin location.
|
|
Select or List - Icon
By using the selection icon, an adjustable selection list opens. Window settings and templates are supported.
The Definition of the bin location is mandatory.
|
If the bin location is not defined, Beas uses the default bin location for this item for the specified transaction type.
This is entirely managed by SAP Business One.
Drop-down for volume or weight is not supported. Columns are always 0.
beas 9.3 PL 2
|
Bin location is mandatory.
Drop-down for volume and weight not supported.
|
This list can be modified in the Configuration Wizard. General manipulation is possible using the stockmanagement.src file or window-related changes using Windowevent setbindropdown.
The following priorities are considered:
1.Window-related customization (windowevent setbindropown)
2.General changes (stockmanagement.src)
3.Settings in the Configuration wizard
In the e_bindropdownbsl variable, the ODATA command can be defined.
It is beneficial to use the Beas service layer, because Beas supports different warehouse systems that use different tables and logic.
The standard functions for receipt and issue are as folows:
file stockmanagement.src
function binreceiptdropdown
setvar=e_bindropdownbsl=BinLocation(<e_binwhscode,bsl>)?$mask=1
end function
function binissuedropdown
setvar=e_bindropdownbsl=WareHouseStock(<e_binwhscode,bsl>)?$select=BinLocation/BinCode,BinLocation/BinColor,OnHand,UoMCode,Batch,IVersionId,BatchAttribute1,BatchAttribute2,ExpirationDate&$filter=ItemCode eq <e_itemcode,bsl> and OnHand gt 0
end function
For receipt, use BinLocation.
For issue, use WareHouseStock.
For more information, see Beas Service Layer documentation.
Example
-- file stockmanagement.src --
// BinReceipt: Show all Bin Locations, ordered by OnHand descending, BinCode ascending:
function binreceiptdropdown
setvar=e_bindropdownbsl=BinLocation(<e_binwhscode,bsl>)?$select=BinLocation/BinCode,BinLocation/BinColor,OnHand&$orderby=OnHand desc,BinLocation/BinCode asc
end function
// BinIssue: Show only Bin Locations where OnHand > 0 of the selected ItemCode, ordered by OnHand descending, BinCode ascending:
function binissuedropdown
setvar=e_bindropdownbsl=WareHouseStock(<e_binwhscode,bsl>)?$select=BinLocation/BinCode,BinLocation/BinColor,OnHand,UoMCode,Batch&$filter=ItemCode eq <e_itemcode,bsl> and OnHand gt 0&$orderby=OnHand desc, BinLocation/BinCode asc
end function
|
Attention: This is available only up to Beas 9.3 PL 1 – in maintenance.
This list can be modified in the Configuration Wizard. General manipulation is possible using the stockmanagement.src file or window-related changes using Windowevent setbindropdown.
The following priorities are considered:
1.Window-related customization (windowevent)
2.General changes (stockmanagement.src)
3.Settings in the Configuration wizard
Window-specific adjustments:
Call the setbindropdown user event. The dropdown:bin_from variable can be defined.
Example:
windowevent setbindropdown
setvar=e_bindropdown=ddsql=select "BINCODE" from "BEAS_WHSBIN" where "WhsCode"=<e_binwhscode,dbstring> order by "STORAGESORT"
end event
Note: This window event is supported in every window where the selection field is available.
General adjustment
Use the stockmanagement:binreceiptdropdown() function to store a custom drop-down configuration.
file stockmanagement.src
function binreceiptdropdown
setvar=e_bindropdown=ddsql=select "BINCODE" from "BEAS_WHSBIN" where "WhsCode"=<e_binwhscode,dbstring> order by "STORAGESORT"
end function
|
|
|
Posting date
|
Important: If a work order time receipt is edited subsequently or canceled, the revaluation or cancellation of the linked journal entries is performed on the new valuation date.
NOTE: This date only affects "receipt" documents. For "Issue" documents, the system sets the current date by default and the only way to modify that date is to modify "Issue quantity changeable" to 'Yes'.
|
|
|
If a report is stored, the button "Label" is displayed automatically, as soon as the work order was selected or posted. Always the information of the last posting is printed.
There is no default report.
Setup:
1. Create a report.
2. Store the report in this window in the macro.
3. Close window and re-open.
4. Printing is available now.
Available variables:
<docentry> = docentry from last document from table OIGE.DocEntry
<docnum> = Document number OIGE.DocNum
Compatibility:
Until beas9.0 Patch3 the button "Label" was displayed always and the report "Box label" was printed. If it was not existing, no label was printed.To enable printing, setup this report as described above.
See Macro
|
 Webinar 8/2017, Part Work order Backflushing Booking Webinar 8/2017, Part Work order Backflushing Booking
See also Work order backflushing booking, Material posting
Help URL: https://help.beascloud.com/beas202604/index.html?terminal_wo_backflush.htm
|