Scheduling tab

MRP > MRP Wizard > MRP scenario planning > Scheduling

Top  Previous  Next
Expand/Collapse Toggles

The details of an MRP computation scenario is set up in scheduling. The current scenario is shown in the title bar of the window.

PATH: MRP > MRP Wizard > Select a scenario > click the Edit button > Scheduling tab.
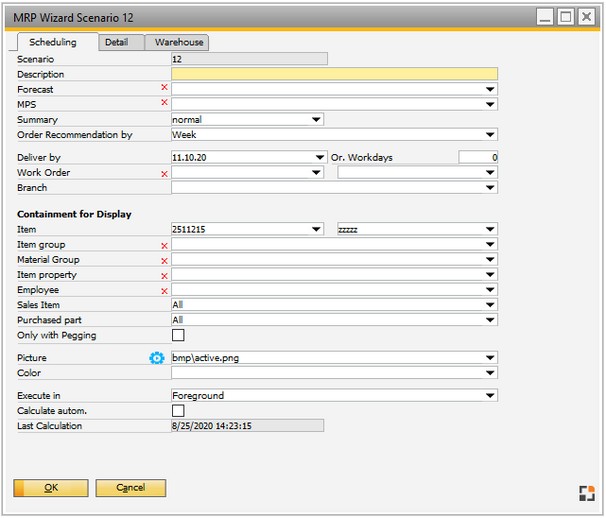
MRP_Scenario_SAPStyle

Window: mrp_edit


Field

Description

Scenario

ID of the plan.

Description

Long description of the plan.

Forecast

More than one forecast can be added to this scenario. A new screen is displayed when forecast is selected.

See

Configuration wizard - Forecast

Forecast (SAP)

Planning scenarios - Detail - Forecast

MPS

MPS

Note: The Summary field refers only to usual forecasts, not to MPS forecasts.

What is MPS:


Master Production Scheduling is a rough production planning procedure and is used in Material Requirements Planning to develop a detailed production plan.


The Master Production Schedule is compiled by a Master Scheduler and takes into account the requirements of the various departments, including sales (delivery times), finance (minimizing inventory) and manufacturing (minimizing set-up times). The program plans the production periods and the purchase of materials taking into account the capacities and resources available to the production system.


Beas supports special forecasts, which are treated differently than usual forecasts. These can be used to integrate MPS features.


MPS scheduling can be realized in Excel or other programs and then imported by DTW into SAP Business One. As an alternative, you can use the forecast management of  SAP Business One. Enter MPS-forecasts into the MRP-scenario under "MPS".


For the requirement computation of MPS-planned items, outflows, forecasts and SCM orders are ignored and instead planned outflow from the MPS scheduling is used.

MPS only takes place if the respective item was marked as  an MPS item. This is indicated in item master (Beas) > Master data > Scheduling > Switch "MPS"

Resulting entries are marked with MPS.


Special forecasts

Special forecast are entered in the MRP scenario under MPS.

As opposed to MPS scheduling the respective items are not marked as MPS items. All planned issues are ignored and not consumed. Peggings arising, are marked with the special forecast term.

Note: Planned inflow and outflow of work orders and purchase orders are not affected.

Summary

The forecasts can be summarized by month, regardless of their definition.

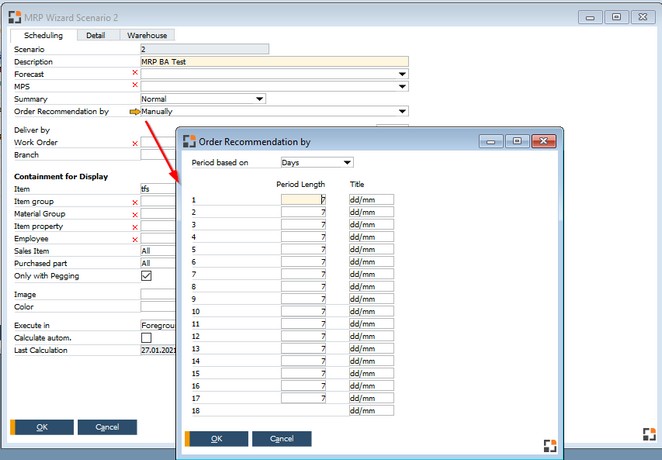
Order recommendation by

Set a time period to display order recommendations for:

Week
2 Weeks
Month
manually


You can see this in the MRP:

PATH: MRP > MRP Wizard > Select a scenario and click the Order recommendation button

mrp_scenario_edit_time2

Window mrp_browse.psr

The number of displayed columns are dynamic and depend on the total time period of the calculation, and

the defined length for each period. Minimum is 2 columns, maximum is 18.

The columns display the start- and enddate in a tooltip, when you move the mouse to the column header.

For more information on "Order recommendation – time areas" See Order recommendation report.


You can define the area manually by choosing the "Manually" option.

PATH: MRP > MRP Wizard > Select a scenario and click the Open button

MRP_order_rec_manual_02

Window mrp_edit_per.psr


By selecting manually the following can be specified:

Period based on: This defines, if the values for the time period represent days, weeks, or months

Period length: Field used to specify the length of the period. The value entered represents the length of each period period. In the example above each period lasts 7 days.

Special periods:

1. The first period will be calculated  from 1900/1/1 until the end of the first period.

The end of the first period depends on "period based on" and is for
- days:  the number of days defined in the first period. The actual day is day one for the period

- weeks: last day of week for the first period, based on today. the actual week is week 1.

- month: last day of month for the first period, based on today. the actual month is month 1.

2. The last period: starts one day after the end of the second to last period. The end is set to the far future(2050/12/31)


Title: Field used to indicate what is to be displayed in order recommendation report. Placeholders are allowed. The following letters represent: YY, year 2 digits; MM, month 2 digits; DD, day 2 digits; and, CC, calendar week 2 digits.

         For example, YY/CC 21/05 for calendar week 5 in year 2021

Note: uppercase (YY) and lowercase (yy) works similarly.

Character

Description

YY

Year 2 digits

YYYY

Year 4 digits

MM

Month 2 digits

DD

Day 2 digits

CC (also: ww)

Calendar week 2 digits


With the manual definition you have also the possibility to influence the count of periods that are shown.
E.g. if you want to show only 5 periods, regardless of the fact that the system has determined a higher number of time periods,

you can just leave the period length and title for period 6 to 18 empty.


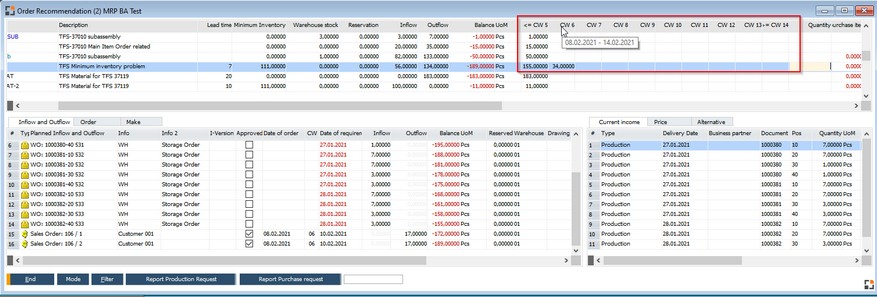
In the order recommendation report items are displayed according to filter settings.

Field

Description

Delivery by

Set the date limit to take into account orders and forecasts. This is a fixed date.

Or. Workdays

This is used when the scenario has been created for multiple executions. This makes the date dynamic, for example the next 60 working days from the current date.

IMPORTANT: If a main demand is not taken into account due to the date, the requisites dependent on it are not calculated, even if the lead time, the order date, or the need date of these requisites fall within the period of computation.

Work order

Display only the item needed for the selected work order. See Containment for Display

Branch

This automatically marks  the correct warehouses in tab "Warehouse".

If you choose a Branch, you can only  see the Warehouses for this Branch in the Tab "Warehouse".


See

Tab Warehouse

Detail – Inventory – Warehouse filter for transactions

Requirement coverage calculation.


beas 9.3 PL 3


Bottom section: Containment for Display

Limitation (affects only the display of the results)

With filter definition you can specify which items should be stored in the results. All peggings are calculated, because an item outside this definition may cause a requirement within this definition. Items outside the defined area will not be saved.

For large amounts of data, the calculation time can be reduced, if the range is limited.

Attention: The MRP cannot display linked information if the linked item is outside the filter area.


hmtoggle_plus1Example

Assembly A à Material position with Item B

Sales order with Assembly A


No filter:

MRP checks A and finds B. In the result you can see A and B.

Right-click on planned outflow for B à Origin: MRP displays Sales Order A as source item.


Filter Only Item "B":

MRP checks A and finds B, but saves only B. In the result you can see only B.

Right-click on planned outflow for B à MRP cannot display the relations because these are not saved.


Alternative:

Calculate all and define the filter in the view itself.


Performance:

If a filter is defined, the calculation can be little faster.


Field

Description

Item (from/to)

Narrow the range of items by item number

Item group

Narrow the range of items by item group

Material group

Narrow the range of items by material group

Item property

Narrow the range of items by item properties

Employee

Limit results to personnel

Sales item

Yes = only items, which are marked as sales items

No = only items, which are not marked as sales items

All = the ID "sales item" is ignored

Purchased part

Yes = only items, which are marked as purchase items

No = only items, which are not marked as purchase items

All = the ID "purchase item" is ignored

Only with Pegging

Default: disabled. All items according to settings are displayed in MRP.


Note: If there are too many items in the database, it is recommended to disable this option. Otherwise the computation may take very long.

Picture

Select an icon (image) to represent the scenario in the MRP Overview list.

Color

Define a color for the list view.


Server

Field

Description

Execute in


Setting

Description

Background

When starting the calculation, a separate task for the calculation is opened. While the calculation is running, it is possible to work with Beas, and the

MRP Browser shows the status of the calculation.

Foreground

The calculation is done directly in the application. While the application is running, it is not possible to work in Beas.

Ask always

When starting the calculation, you can choose if the calculation should be done in back- or foreground.

Last calculation

Date and time of the last calculation.

Calculate automatically

The MRP is calculated automatically by the server at activation. For further information See calculate automatically.


An image and a color can be defined for the schedule.


Help URL: https://help.beascloud.com/beas202102/index.html?planung2.htm