Beas has an integrated, complete HTTP Server

This allows a simple installation and usage of WEB applications
Terminal 2.1, WebConfigurator and all internal services are compatible only to internal HTTP Server
For an example of use see WEB Server
Advantages:
- Fast, because no additional interfaces are required
- Simple to use
- Fully integrated
Without the use of a Proxy server the limitations are:
- Only HTTP, no HTTPS
- Can only transmit the images one after another instead of parallel
In general, the use of the internal WEB server is recommended.
Without additional services this is completely sufficient services at internal use or for presentation.
But a Proxy-server is required if a public access is required or larger image file is transmitted. The setup for this is very simple.
Display of different possibilities
Only internal Beas WEB Server
The client communicates directly with Beas AddOn, because this provides the HTTP Server at the same time.
Because the interface can be renounced, the following changes:
a) Setup and support of Apache HTTP Server are not required
b) Faster processing of Inquiries
But no HTTPS is available
Good for intranet solution or presentation
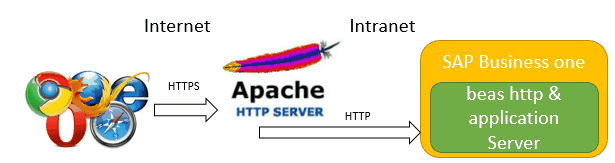
Apache as Proxy Server
The HTTPS protocol has to be used if an internet access is required. The apache HTTP server should be used. This routes the HTTPS inquiries to Beas http and application server using HTTP
Internal Beas Web server only works with HTTP protocol and by default it does not support HTTPS connections. To solve this limitation, you can add a simple configuration by using XAMPP software as a proxy. Follow the steps below:
1. Install XAMPP (the latest version) 2. After installation, the first step is to validate that the server is up and running without any problems:
5. Start the configuration of XAMPP to redirect requests to Beas Web. 6. Modify httpd.conf to uncomment the following text: ule proxy_http_m
#LoadModule proxy_html_module modules/mod_proxy_html.so
7. Start/Stop XAMPP to reload configuration. 8. Modify httpd-ssl.conf to add the rule in the system to redirect incoming requests from XAMPP to BeasWeb. 9. Add the following lines before the end of the file (port should be the port where Beas is running):
ProxyPass / http://localhost:8081/
10. Start/Stop XAMPP to reload the modified configuration.
Continue configuration by generating certificates to make http secure.
|


Beas can be started directly as HTTP Server For this in the directory c:/program files(x86)/beas software/beas start Beas with the parameter /httpserver=[port]
Example:
beas.exe /httpserer=8080 user=manager pwd=manager database=training
Beas can now be used normally. But the HTTP server runs in the background and Beas can be addressed directly. |