|
|
|
|
Warehouse Support SAP Bin Management Beas Bin Management
|
|

The Goods Receipt PO app makes it possible to create a goods receipt for multiple items of a Purchase Order with a single document.
See basic WebApp controls in General Information on WEB APPS Version 2.1.
See Goods Receipt PO
See Configuration wizard settings of the Web Terminal.
WMS: No WMS support.
Header tab
In the Header tab you can select a Purchase Order, a Target Warehouse for the incoming goods, and enter any remarks.
Once the PO is selected, core information on the PO document are displayed:

Field Descriptions
Field |
Description |
|---|---|
Purchase Order |
Select a purchase order from the list to create goods receipt document. |
Target Warehouse |
Select a warehouse for the incoming goods. |
Remarks |
Enter your remarks for the goods receipt document. |
Document No |
The number of the PO document in SAP. |
Supplier |
Card Code of supplier in SAP. |
Name |
Name of supplier. |
Document Date |
The day that the PO was created. |
Filter screen for documents:
In this app, we display different icons based on the Document Type. See image below.
![]()
The Line – Lines tabs function are therefore located in reverse order.
Filter: Search for the PO document for items that need to be received. This field supports GS1-128 bar code scanning.
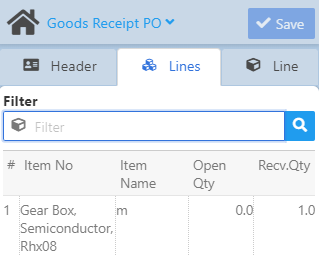
Example: As the image indicates, the PO lines are listed with information on the items by Item Number, Item Name, the Open Quantity (Open Qty) and Rec.Qty (Received Quantity). Once a line has been selected, the app switches to the Line tab. |
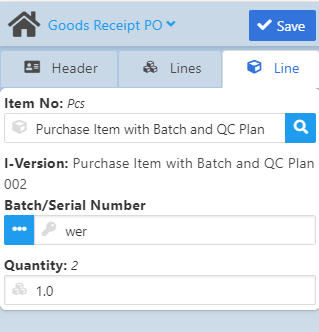
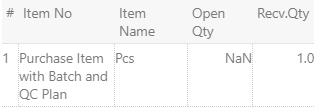
In the Line tab you can enter the quantity of the selected item to be received in the relevant unit of measure. Item Number and also I-Version (if applicable) are automatically filled. Bin Location When the target warehouse is a bin warehouse, you need to select a bin location, as well. The actual number of items in the bin is indicated in brackets above the field. LIMITATION: The receipt process linked with a purchase order is not able to create receipt for the same line into 2 different bin locations at the same time. As a workaround for this, the user can generate the receipt document in 2 steps or receipt full quantity in one bin location and move the required quantity to a different location after the receipt is created. After entering the quantity below, the Goods Receipt PO document is ready to be created. (also see Save button) Example: In the above image we selected 1Pcs of an item. By going back to the Lines tab you can see that the receipt of 1 Pcs for the selected item has been entered:
|
Waiting time: In this parameter you can define the number of seconds that the app should wait until moving forward with the next transaction. |