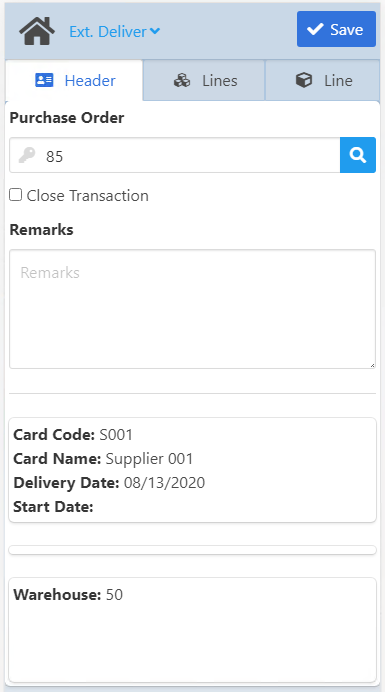
In this tab you can identify the Purchase order first.
Scanner can be used at Purchase order number: (similar to Goods Receipt apps)
For the search the system allows filtering by:
•Purchase order number / line
•Supplier ID
•Supplier name (visible in tablet mode)
Field descriptions
Field
Description
Purchase Order/Line (#DocNum)
Press the magnifying glass button to open the search screen for purchase orders. The filtered information appears in the order of delivery dates for the POs.
Scrap
Enter scrap quantity (if any).
Close Transaction
With this radio box you can select to close transaction when creating the Goods Receipt Purchase Order document.
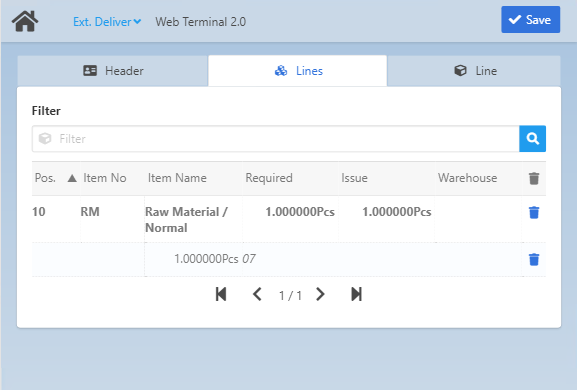
After selecting the purchase order in the Header tab, the Lines tab opens, providing a read-only list of the related items. After selecting a line in the Lines tab, the app switches to the Line tab. Once you have pre-assigned quantities for an item in the Line tab, these quantities appear in secondary lines below the line in the Lines tab. With the recycle bin icon, here you can delete a pre-assigned item completely or delete the selected pre-assigned quantity of the line in its secondary line.
NOTE: If you create an external purchase order for reserved BoM WO quantities, the system automatically selects them, and completes the remaining quantities to be transferred from another warehouse.
Field descriptions
Field
Description
Pos.
Position number
Item No
item code
Item Name
item name
Required
Required quantities.
▪Red: when Open Quantity is > 1
▪Green= When open Quantity is 0
▪Yellow= When open Quantity is < 0 (negative) when reserved more than planned.
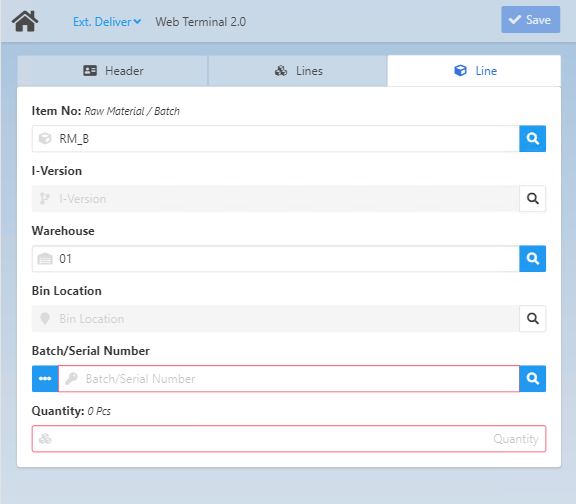
Here you can enter information regarding quantities and inventory locations.
Field Descriptions
Field
Description
Item No
Select the Item to post-in. The caption above the field gives a description on the exact type: in the example above (see image) the selected entry is a "Purchase Item with Batch and Bin location". This field supports GS1-128 bar code scanning.
I-Version
Visible and editable in case of version-managed items. If the item has several versions, you can select the version with the magnifying glass or simply start typing it in the field. When the item is batch-managed, this field also shows the number of selected batches.
Note: It is only possible to create a manual receipt of an item version with "Released" status.
After the selection, the Warehouse code is displayed. The exact name of the warehouse and the actual number of items in the warehouse are indicated in brackets above the field. The last used Warehouse is automatically stored and used by the system at the next document creation.
When selecting a bin warehouse, this field is activated to select a bin location for the item. The actual number of items in the bin is indicated in brackets above the field.
Receipt Rules
Issue Rules
Limitation of Beas Bin Management:
- RFID definition is not supported
-Batch/Serial Extended selection: It is not possible to select multiple bin locations from an SAP Bin-managed warehouse or Beas bin-managed warehouse.
Limitation of SAP Bin Management:
- not all Bin Rules are supported in the current view
- Weight/Volume are currently not supported in the current view
- Batch/Serial Extended selection: It is not possible to select multiple bin locations from an SAP Bin-managed warehouse or Beas bin-managed warehouse.
The opens the "Batch/Serials: Extended Information" screen. In this application you can edit all applicable fields (in "Receipt mode" – see link below).
It is possible to create a goods receipt for a number of batches/serials of the same item with the plus icon. The field in the main screen then displays the number of selected batches – see image above.
Note: If mandatory information is missing in the Extended information screen, the Batch/Serial Number field will indicate it with a red border in the main screen, even though the field itself is not empty.
In case of a serial-managed item, the serial mode is automatic: you can leave the serial field empty, and the quantities will be picked automatically by Beas.

 .
.