Click a group code in the Material Groups list to open its Object Page detail view. This view follows the SAP Fiori Object Page pattern and is divided into a header area and multiple form sections. The page opens in display mode by default; click the Edit button (pencil icon) to switch to edit mode.
Direct URL: views/material-groups/{ID}
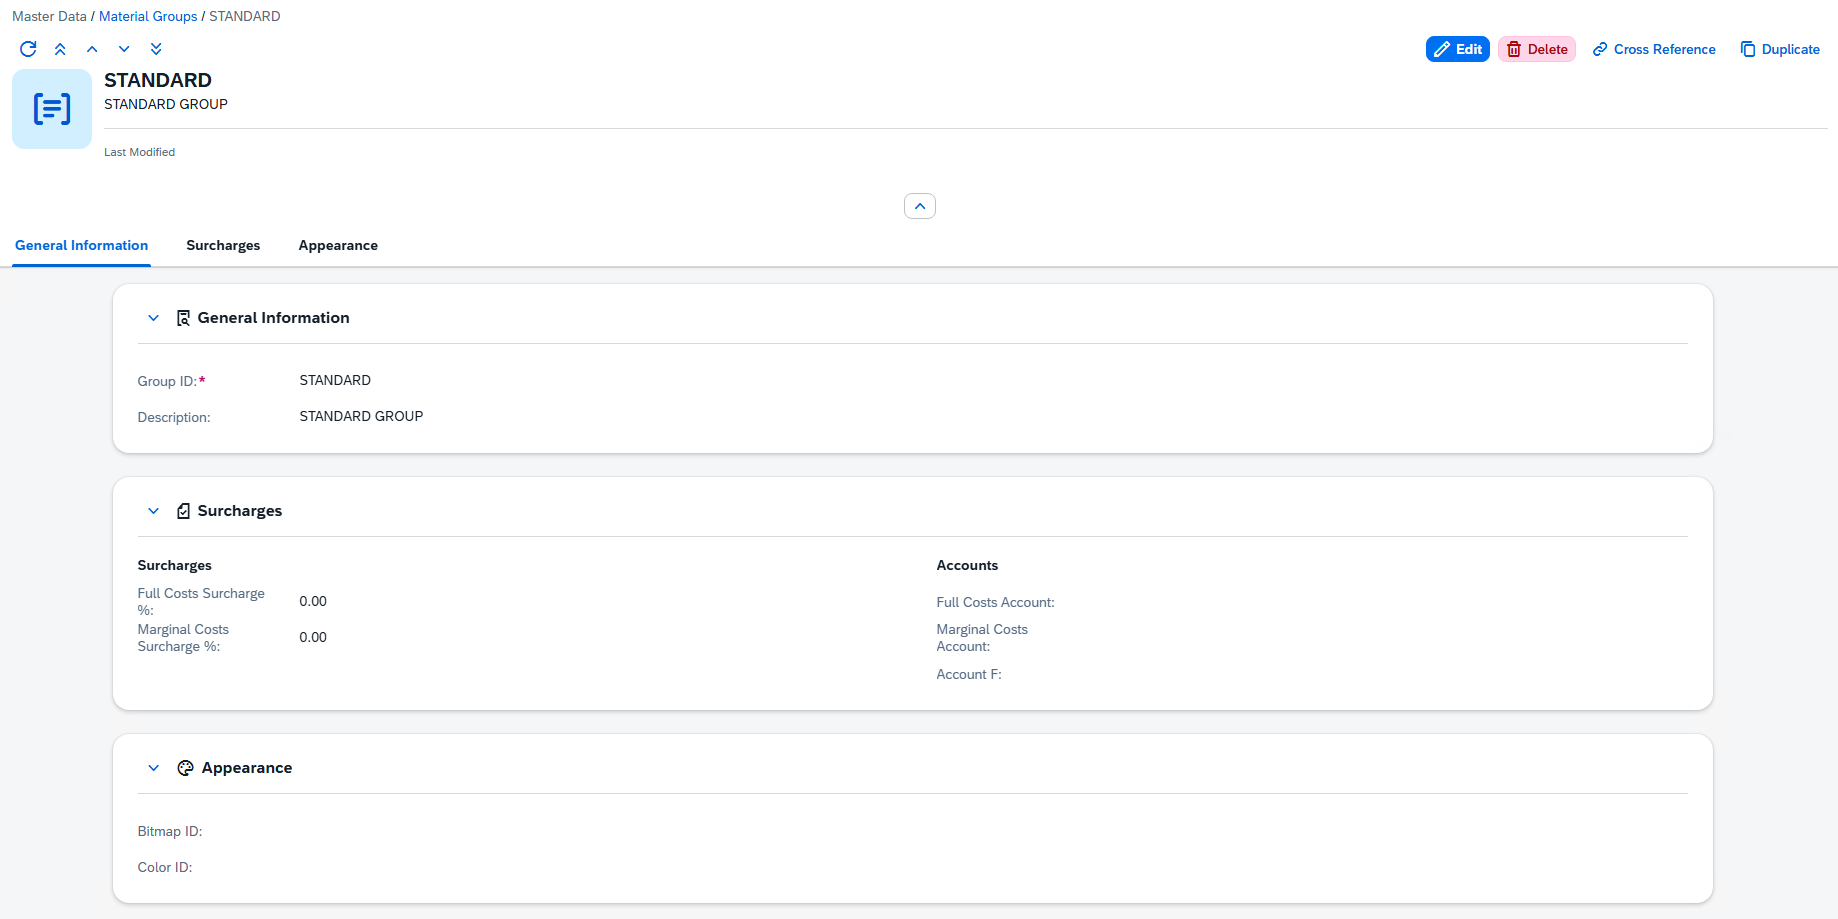
Header Area
The header displays at a glance the most important information about the material group:
•Avatar — Shows the assigned Bitmap icon (SAP icon, Beas icon, or custom image). If no icon is assigned, a default group icon is shown.
•Title — The material group code.
•Subtitle — The description (Additional Info) of the group.
•Last Modified — A facet showing the date and time of the most recent modification.
The header also contains action buttons for Cross Reference and Duplicate (visible in display mode only, and only for existing records — not when creating a new group).
General Information
The first section contains the fundamental identifying fields for the material group.
Field |
Description |
Constraints |
|---|---|---|
Group |
The unique identifier code for this material group. This is the primary key used throughout the system to reference the group. It is set when the group is first created and cannot be changed afterward. Choose a meaningful, concise code that clearly identifies the category. |
Required. Maximum 20 characters. Editable only during creation. |
Description |
A free-text description field. Use this to provide a human-readable explanation of what the group represents — for example, "Ferrous metals and alloys" or "Electronic components". This description appears in the list view and in the Choose-from-List dialogs when other records reference material groups. |
Optional. Maximum 255 characters. |
Surcharges
This section controls cost surcharges and G/L account assignments for the group. It is divided into two sub-groups: Surcharges and Accounts.
- Type
Surcharge percentages are applied during cost calculations for items belonging to this group. They allow you to add a markup at the group level that is factored into cost roll-ups.
Field |
Description |
Constraints |
|---|---|---|
Full Costs Surcharge % |
The percentage surcharge added to the full cost calculation. For example, a value of 10.50 means a 10.5% surcharge is applied on top of the base full cost. |
0 – 100. Supports up to 2 decimal places. |
Marginal Costs Surcharge % |
The percentage surcharge added to the marginal cost calculation. |
0 – 100. Supports up to 2 decimal places. |
- Accounts
These fields link the material group to specific General Ledger (G/L) accounts in your accounting system. They are used during cost postings to route financial entries to the correct accounts.
Field |
Description |
Constraints |
|---|---|---|
Full Costs Account |
The G/L account number used when posting full cost entries for items in this group. |
Optional. Maximum 15 characters. |
Marginal Costs Account |
The G/L account number used when posting marginal cost entries for items in this group. |
Optional. Maximum 15 characters. |
Fixed Costs Account |
The G/L account number used when posting fixed cost entries for items in this group. |
Optional. Maximum 15 characters. |
Appearance
The Appearance section lets you assign visual identifiers to the material group. These are displayed in the list view and in the detail header, making it easier to distinguish groups at a glance.
Field |
Description |
|---|---|
Icon |
An icon or image for visual identification. Click the field to open the Icon Picker, which lets you choose from three sources: •SAP Icons — The standard SAP icon library (e.g., "sap-icon://product"). •Beas Icons — Custom icons provided by the Beas system. •Custom Images — Upload your own image file. The selected icon appears as the avatar in the header and as a small graphic in the list view. |
Color ID |
A numeric color identifier. Click the field to open the Color Picker and select a color. This color is used for visual distinction in lists, charts, and anywhere the group is displayed with color coding. |
Custom Fields (UDF 1 – 4)
The Custom Fields section provides up to four User-Defined Fields (UDF 1 through UDF 4). These are general-purpose text fields that you can use to store any additional information specific to your business needs.
Each field supports up to 50 characters of text. The labels and visibility of these fields are managed centrally through the UDF Configuration screen (accessible via System › UDF Configuration). If a UDF has not been configured, it may appear with a default label or may be hidden entirely.
To create a new material group, follow these steps: 1. From the list view, click the "+" button in the toolbar. The application navigates to a blank Object Page form with the title "New Material Group". 2. Enter a unique Group code. This is the only field that is required. Choose the code carefully — it cannot be changed after the record is saved. The code must be unique across all material groups and can contain up to 20 characters. 3. Fill in the remaining fields as needed: o4. Add a meaningful Additional Info description. o5. Set the surcharge percentages if this group should apply cost markups. o6. Assign G/L account numbers for cost postings. o7. Optionally choose an icon and color for visual identification. o8. Fill in any Custom Fields (UDFs) as needed by your organization. 9. Click Save. The system validates the input (checking required fields, length limits, and surcharge ranges), creates the record, and navigates to the newly created material group's detail view. A success notification confirms the creation. Duplicate Code: If you attempt to create a material group with a code that already exists, the system will return an error and the record will not be saved. Choose a different, unique code. |
1. Open the material group you want to edit by clicking its code in the list view. The detail view opens in display mode. 2. Click the Edit button in the page header to switch to edit mode. All editable fields become active. 3. Make your changes. Note that the Group code field remains read-only — it can only be set during creation. 4. Click Save in the right bottom part of the screen to keep your changes. The Modified and Modified By audit fields will be updated automatically. Alternatively, click Cancel to discard all unsaved changes and return to display mode. Unsaved Changes Protection: If you attempt to navigate away from the page while in edit mode with unsaved changes, the system will display a confirmation prompt asking whether you want to discard your changes or stay on the page. This prevents accidental loss of work. |
The Cross Reference feature provides a way to see which Items are currently assigned to a specific material group. This is invaluable for understanding the impact of changes to a group (such as modifying surcharge percentages) and for verifying that items are correctly categorized. How to Use Cross Reference 1. Open the material group whose references you want to inspect by navigating to its detail view. 2. Make sure you are in display mode. The Cross Reference button is a toolbar action with a chain-link icon, and it only appears for existing (saved) records — not during creation of a new group. 3. Click the Cross Reference button. A dialog window opens, displaying a table of all Items that have this material group assigned. The dialog is a read-only list that queries the Items endpoint, filtered to show only items whose Material Group field matches the current group's code. It displays the following columns:
You can search within the dialog by typing in the search bar — the search filters across both the item code and the item name columns. This is particularly useful when a material group is assigned to a large number of items and you need to find a specific one. Real-time Data: The cross reference dialog queries the live Items data every time it is opened. If you have just assigned or removed a material group from an item (see Linking Items to a Material Group), the changes will be reflected immediately when you open the cross reference dialog. Read-Only: The cross reference dialog is for viewing purposes only. You cannot edit items or change their material group assignment from within this dialog. To change an item's material group, open the item in the Items detail view (see Linking Items to a Material Group). |
 Linking Items to a Material Group
The connection between an Item and a Material Group is established on the Item side. Each item has a Material Group field (located in the Item's detail view under Production Data › Materials & Scrap) that stores the code of the material group it belongs to. How to Assign a Material Group to an Item 1. Navigate to Master Data › Items and open the item you want to link to a material group. 2. Click the Edit button (pencil icon) to enter edit mode. 3. Scroll to the Production Data section and locate the Materials & Scrap subsection. 4. In the Material Group field, you have two options: o5. Type directly — Enter the material group code manually if you know it. o6. Use the Choose-from-List button — Click the browse button next to the field. A dialog opens showing all available material groups with their Code and Description columns. You can search and filter within this dialog to find the group you need. Click on a row to select it, and the group code will be populated into the field. 7. Click Save to persist the change. The item is now linked to the selected material group. The Choose-from-List (CFL) dialog provides a convenient way to browse and select a material group without needing to remember exact codes. The dialog includes: •A search bar that filters across both the Code and Description fields. •Individual filter fields for Code and Description, accessible via the Adapt Filters area. •Sorting by clicking column headers. Simply click a row in the dialog to select the material group and close the dialog. The selected group's code will be filled into the Material Group field on the item form. To remove a material group from an item, open the item in edit mode, clear the Material Group field (delete the existing value), and save. To change it, simply select or type a different material group code and save. After saving an item with a material group assignment, you can verify the link from either direction: •From the Item — The Material Group field on the item's detail view displays the assigned group code. •From the Material Group — Open the material group and click Cross Reference. The item you just saved should appear in the list. See Cross Reference for details. Two-way Visibility: The link between Items and Material Groups is always visible from both sides. Changes made on the Item side (assigning, changing, or removing a material group) are immediately reflected in the Material Group's Cross Reference dialog. There is no delay or synchronization step required. |
Material groups can be deleted from two places:
From the List View 1. Select one or more material groups by clicking the check boxes in the rows. 2. Click the Delete button in the toolbar. 3. A confirmation dialog appears: o4. For a single selection, the dialog names the specific group being deleted. o5. For multiple selections, the dialog shows how many groups will be deleted. 6. Click Confirm to proceed, or Cancel to abort. While viewing a material group's detail page, click the Delete button. A confirmation dialog appears before the deletion is executed.
To delete such a group, you must first reassign or remove the material group from all referencing items and raw materials. You can use the Cross Reference feature to identify which items are linked to the group, then edit each item to change or clear its Material Group field. Deletion is Permanent Once a material group is deleted, it cannot be recovered. Make sure you have reviewed the cross references and are certain the group is no longer needed before confirming deletion. |
Record Navigation
When viewing a material group's detail page, you can navigate between records without returning to the list view. The navigation toolbar provides four buttons:
Button |
Action |
|---|---|
First |
Jump to the first material group in the list. |
Previous |
Move to the previous material group. |
Next |
Move to the next material group. |
Last |
Jump to the last material group in the list. |
The order of navigation follows the same sorting applied in the list view. If you had sorted the list by Description descending, the Previous/Next navigation in the detail view will follow that same order.