Assembling the configuration

Contents
DISCLAIMER: This REST API has several components of the desktop configurator, and this is the reason why assembling the configuration can be challenging.
Real example
Let's suppose we have the following JSON as reponse to an initial load:
{
"checkbox_translation": ["No", "Yes"],
"currency": "EUR",
"currency_display": "EUR",
"descr": "",
"rows": [
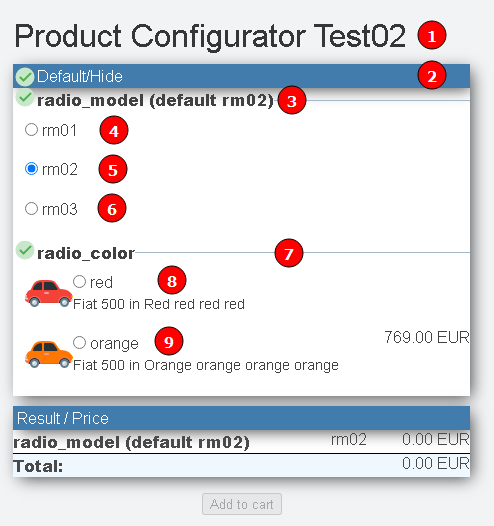
{"nr":1,"typ":"3","parameter":"","bezeichnung":"Product Configurator Test02","vorgabe":"","verweis":"","bild1":"","eingabetyp":" ","preis1":0,"langtext":"","visible":1,"status":0,"d":0},
{"nr":2,"typ":"1","parameter":"#2","bezeichnung":"Default/Hide","vorgabe":"","verweis":"","bild1":"","eingabetyp":" ","preis1":0,"langtext":"","visible":1,"status":0,"d":0},
{"nr":3,"typ":"0","parameter":"radio_model","bezeichnung":"radio_model (default rm02)","vorgabe":"rm02","verweis":" ","bild1":" ","eingabetyp":"N","preis1":0,"langtext":" ","visible":1,"status":0,"d":1},
{"nr":4,"typ":"200","parameter":"rm01","bezeichnung":"rm01","vorgabe":"N","verweis":" ","bild1":" ","eingabetyp":" ","preis1":0,"langtext":" ","visible":1,"status":0,"d":0},
{"nr":5,"typ":"200","parameter":"rm02","bezeichnung":"rm02","vorgabe":"Y","verweis":" ","bild1":" ","eingabetyp":" ","preis1":0,"langtext":" ","visible":1,"status":0,"d":0},
{"nr":6,"typ":"200","parameter":"rm03","bezeichnung":"rm03","vorgabe":"N","verweis":"","bild1":"","eingabetyp":" ","preis1":0,"langtext":"","visible":1,"status":0,"d":0},
{"nr":7,"typ":"0","parameter":"radio_color","bezeichnung":"","vorgabe":"green","verweis":" ","bild1":" ","eingabetyp":"N","preis1":0,"langtext":" ","visible":1,"status":0,"d":0},
{"nr":8,"typ":"200","parameter":"red","bezeichnung":"red","vorgabe":"N","verweis":" ","bild1":"fiat500_red.png","eingabetyp":" ","preis1":0,"langtext":"Fiat 500 in Red\nred red red","visible":1,"status":0,"d":0},
{"nr":9,"typ":"200","parameter":"orange","bezeichnung":"orange","vorgabe":"N","verweis":" ","bild1":"fiat500_orange.png","eingabetyp":" ","preis1":769.000000,"langtext":"Fiat 500 in Orange\norange orange orange","visible":1,"status":0,"d":0},
{"nr":10,"typ":"200","parameter":"green","bezeichnung":"green","vorgabe":"Y","verweis":" ","bild1":"fiat500_green.png","eingabetyp":" ","preis1":0,"langtext":"Fiat 500 in green\nGreen green green","visible":0,"status":0,"d":0}
],
"title": "default"
}
The configuration should look similar to this after your assemble it:
This example shows how we render the configuration in our web user interface:
|
For this example, every row has been highlighted with its own NR to see how it is rendered.
Note: "visible": 0 |