|
With this app you can create a Time Receipt for a Production order. See basic functions in General Information on WEB APPS Version 2.1.
The app consists of three tabs: Header, Lines and Line.
It is possible to provide the bar code of the WO information by scanning or manual input. Filtering is possible with the magnifying glass icon: tapping on it opens the "WO Routing Search" screen, where you can select the operation to receipt. (See image below).
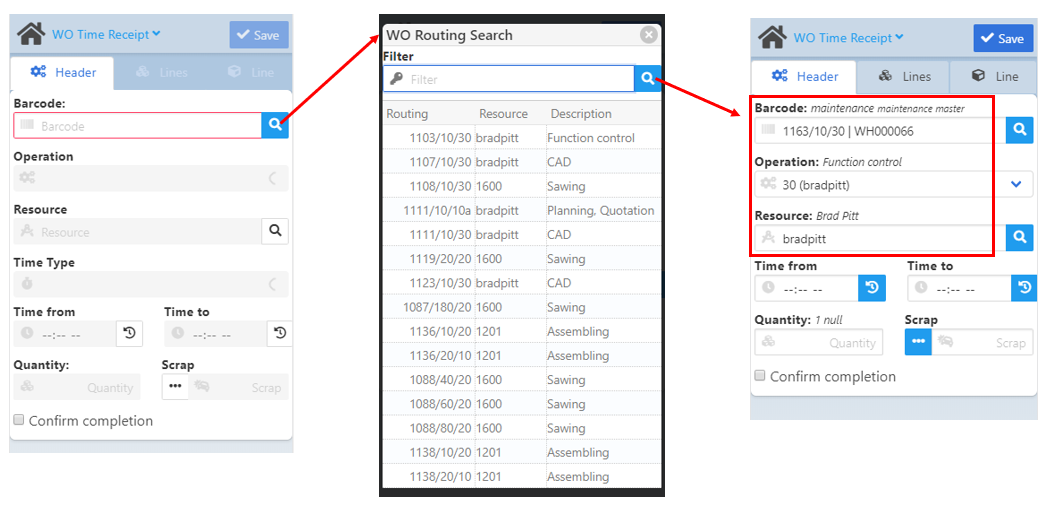
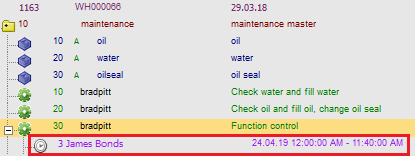
Upon saving, the Time Receipt is visible in SAP B1 > Work orders. The below image displays the receipt for the operation selected above:
 Header tab Header tab
Field Descriptions
Field
|
Description
|
Barcode
|
Using the bar code scanner, the bar code of the WO operation appears in the field, filling all WO-related information automatically (see third image above).
The information is displayed with WO number / WO positions and indicating the WO item name in italics right to the field name (see third image above).
|
Operation
|
The field is automatically filled with the information coming from WO-number scanning or manual input. The WO position number of the operation appears in the field along with the name of the used Resource in brackets – see third image above: 30 (bradpitt) . The description of the operation is indicated in italics right to the field name ("Function control" in our example above).
|
Resource
|
The field is automatically filled with the information coming from WO-number scanning or manual input. The name of the Resource appears in the field, and its description is displayed right to the field name.
|
Time from / Time to
|
The earliest possible "Time from" input is the actual time according to the system.
AM or PM is mandatory information to add once the fields are edited.
Tapping on either of the two  icons will display the actual time in the given field according to the system. Once the duration of the operation is set with the two fields, the duration is indicated in minutes right to the "Time to" field name – see image below: the duration is 119 minutes. icons will display the actual time in the given field according to the system. Once the duration of the operation is set with the two fields, the duration is indicated in minutes right to the "Time to" field name – see image below: the duration is 119 minutes.
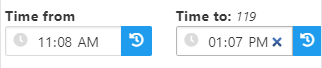
Note: The app can only be used for the current day, and it is not possible to create a time receipt over midnight.
|
|
Duration
|
According to the app setup, you can make this field visible. See more details of extended App settings.
Note: The field is not editable if "Field duration blocked" parameter was selected in Configuration wizard > FDC > View Time Receipts.
|
Quantity
|
Provide the quantity to be receipted.
Indicated right of the field name:
- pending/total quantity. Pending quantity is based on previously reported time receipt quantities
- Unit of measure
|
Scrap
|
Provide the scrap quantity if necessary. Tapping on the  icon opens the "Scrap reasons" screen where you can select scrap quantity by scrap reasons and enter a description. icon opens the "Scrap reasons" screen where you can select scrap quantity by scrap reasons and enter a description.
|
Confirm completion
|
Select this check box to confirm completion of the operation.
|
Batch/Serial Number
|
Visible only in case of Batch/Serial-managed items. The icon opens the Batch/Serial: Extended Information screen in Receipt Mode (see the same link).
|
Bin Location
|
Select the bin location by tapping the magnifying glass icon.
|
|
Once mandatory information are filled in the Header, the screen automatically switches to the Lines tab.
Other relevant information can be entered at this point by going back to the Header tab (see fields in the table above).
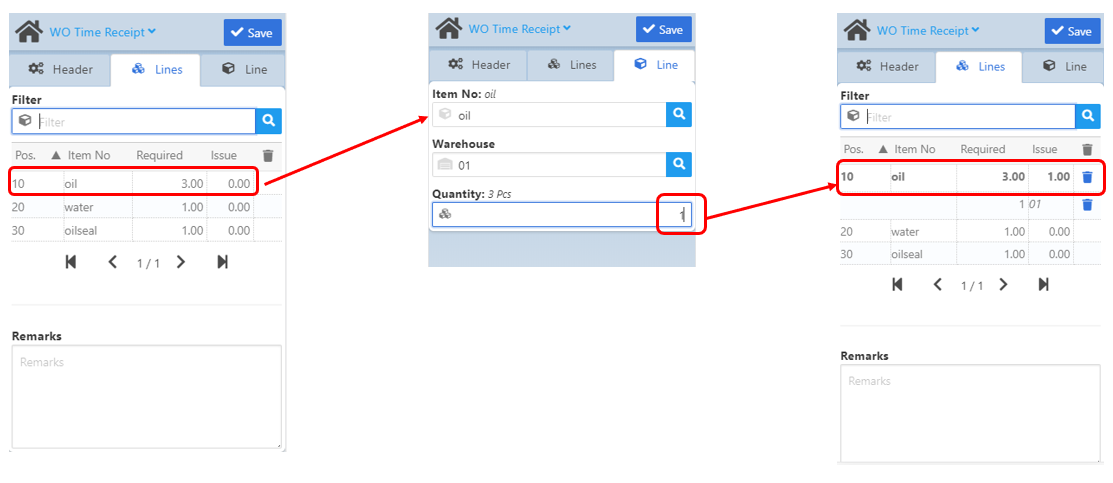
The Lines tab displays a list of the WO positions of the operation by Position number, Item number, Required quantity and Issued quantity.
By selecting a WO position in the list, the screen automatically switches to the Line tab where you can provide the quantity to be issued for the given item (see image below).
Field Descriptions
Field
|
Description
|
Filter
|
Search for an item.
WMS Integration: If the receipt is made from BEAS in a WMS warehouse, it applies the Quality status defined in Produmex WMS > Organizational Structure > Production tab.
NOTE: Beas does not support Quality Status by item.
|
Pos.
|
Work order position
|
Item No
|
Item number
|
Required
|
Quantity required by the Work order.
WMS SSCC/LUID information is displayed.
|
issue
|
issued quantity
|
WhsCode
|
Warehouse number
|
LUID/SSCC
|
Logistic Unit number / SSCC (WMS)
|
Remarks
|
Free text.
|
The  trash can icon becomes active (blue) once quantity is issued for a WO position, and the issued quantity then is deletable. trash can icon becomes active (blue) once quantity is issued for a WO position, and the issued quantity then is deletable.
Issued quantities are displayed in bold font.
As in other WEBapps, Remarks may be added before saving the document.
|
Besides adding the quantity to be receipted, it is possible to select the Warehouse/Bin location for the item(s).
Field Descriptions
Field
|
Description
|
Item No
|
Item number
|
I-Version
|
Item version
|
Warehouse
|
|
Bin Location
|
When the Warehouse for the item has been selected, this field shows the exact bin
location (if available). In case of a batch/serial-managed item, this field is
automatically filled by the system after selecting the batch/serial in the Batch/Serial
Number field.
Mobile View:
The field is only visible if the field is required.
Desktop / Tablet View:
The field is non-editable if the field is not required.
Receipt Rules
Issue Rules
Limitation of Beas Bin Management:
- RFID definition is not supported
Limitation of SAP Bin Management:
- not all Bin Rules are supported in the current view
- Weight/Volume are currently not supported in the current view
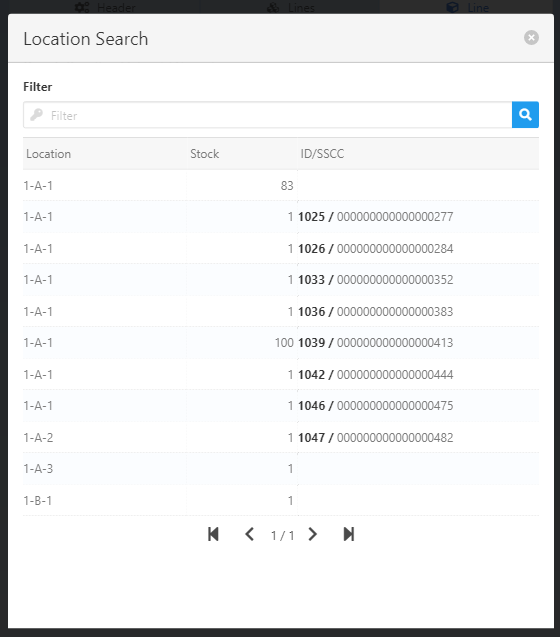
For normal items, select the Produmex WMS logistic unit of your choice in the "Location Search" screen that opens when you tap the  magnifying glass icon. magnifying glass icon.
Field
|
Description
|
Location
|
Bin Location ID
|
Stock
|
Available quantity in the bin location
|
ID/SSCC
|
LUID - logistical unit ID) - SSCC number (WMS)
|
In case of WMS bin-warehouses, tap the button to open the LUIDs selector screen to provide the LUID and
the quantity. The screen allows to select the same item from more than one logistic unit (LUID) at a time.
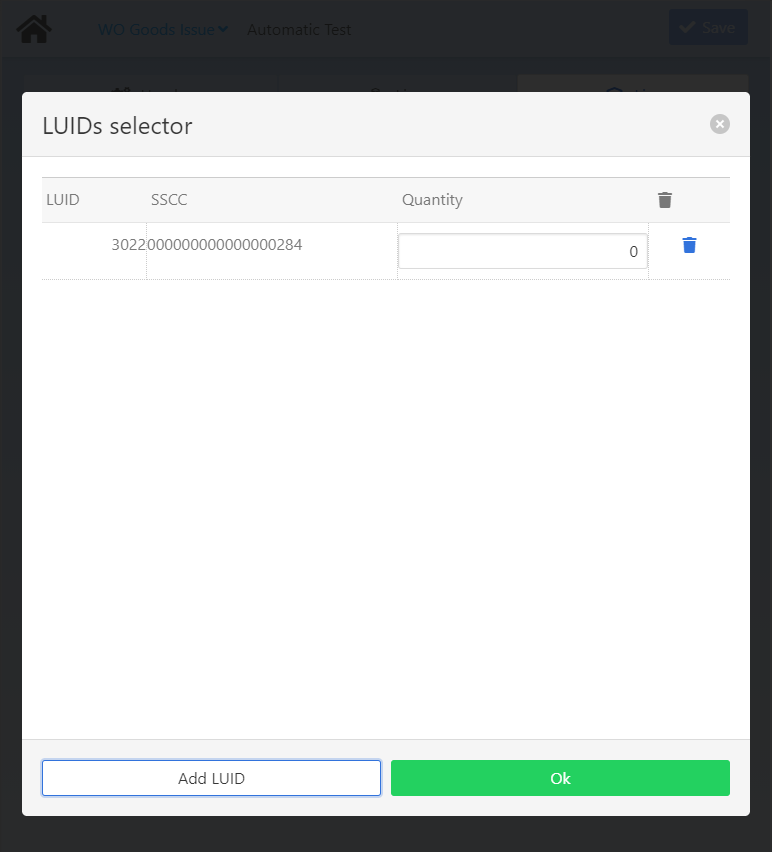
Add LUID button: Add more LUIDs and close the screen with the OK button. the available number for the
selected item, LUID name and description are indicated in brackets above the field in the Line tab after you close this screen.
|
|
Batch/Serial Number
|
Batch/Serial number search.
The opens the "Batch/Serials: Extended Information" screen. In this application you can edit Batch/Serial number, Version and Quantity fields. See other, non-editable attributes in Extended information screen.
WMS integration: Tap the magnifying glass icon to filter by LUID.
Note: It is not possible to do so with the Batch/Serial Extended Information screen.
Mobile View:
The field is only visible if the field is required.
Desktop / Tablet View:
The field is non-editable if the field is not required.
WMS integration: Tap the magnifying glass or to filter by LUID.
|
Quantity
|
Required Quantity
|
Tapping on the magnifying glass icon right to the "Item no." field switches the screen back to the Lines tab to edit another item of another WO position.
|
Limitations:
The following features/functions are NOT supported:
- Receipt over midnight
- Manual receipt for negative positions
- Pool functions
- Backflush Master Slave
- Scrap material posting
- Intermediate report
- Logon/Logoff rules
- Open QC Order after transaction
Help URL: https://help.beascloud.com/beas202106/index.html?wo_time_receipt.htm
|