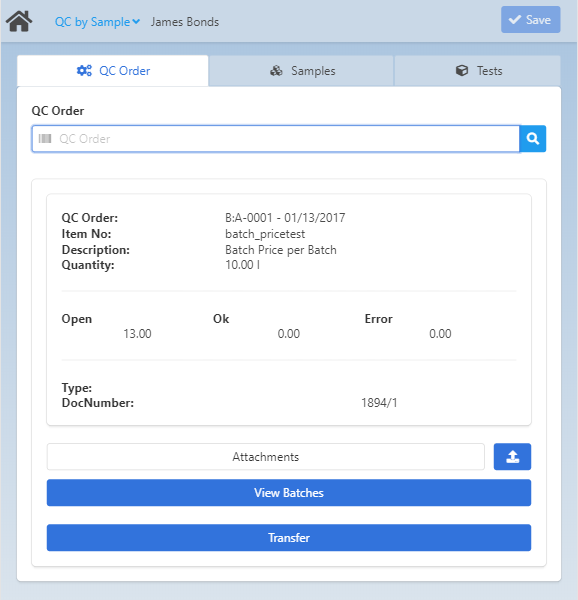
In the Header you can identify the QC Order. You can retrieve information on the item, description, quantity, released-blocked-faulty samples etc.
Field Descriptions
Field
Description
QC Order - filter field
Add the QC order number by typing or using a bar code scanner. Alternatively, you can click on the magnifying glass, and the "QC Order Search" window appears to select an order.
The field uses auto-completion: start typing to narrow down the search.
Note: This behavior is not available in the Filter field of the "QC Order Search" pop-up window.
Information area
QC Order
QC Order number and the day of creation
Item No
Item number
Description
Item description
Quantity
Quantity already posted or to be checked.
Open - OK - Error
- Open: Number of samples not yet released.
- OK: Number of released samples
- Error: Number of samples marked as faulty
Type
The type of origin document the QC order was created from – work order, goods receipt etc. Seedocument types.
DocNumber
Number of the origin document
WO
Visible if the origin document is a Work order.
Attachments
Click the upload button to upload image or document files as attachments to the QC Order.
Note: You may need a proper viewer on your device to open the document (especially if you are using a mobile device).
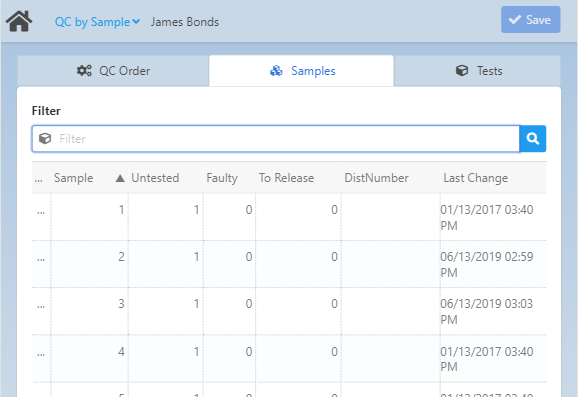
Filtering field to search for serials or add a sample number here. Tap the magnifying glass, type Serial number or scan bar code.
...
Tap here to provide additional values for a sample in a pop-up window:
Release 1 – Only available for Manual options. Dropdown menu for Release status.
Release 2 – Only available if release 1 was selected.
Blockage reason: Dropdown of blockage reason. An additional informational field is provided under the dropdown.
Valuation: Dropdown of valuation reasons to select from. An additional informational field is provided under the dropdown.
Save: Tap the button to update the sample. After updating, the released samples will not be visible in the list.
Cancel: Close the pop-up window without changes.
Sample
Sample number
Untested
Number of unchecked measurement positions.
Serial
Visible only in case of serials.
Faulty
(Optional for tablets or computers)
Number of measurement positions marked as faulty (with blockage reason).
To Release
(Optional for tablets or computers)
Number of measurement positions to be released.
DistNumber
Serial number information
Last Change
(Optional for tablets or computers)
Data/Time of the last change.
+ Add New Sample
Tap the + Add New Sample button to register a new sample. A new row appears in the list where you can add values by clicking the desired section in the list.
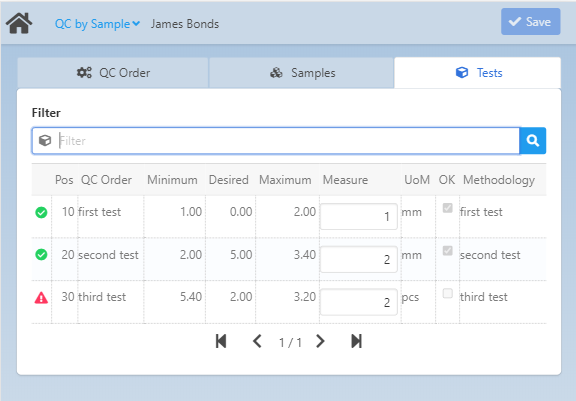
By tapping any part of the list, the app switches to the Test tab.
This option must be activated if this measuring point is relevant for the release of the test plan.
Note: For automated release at least one relevant position is required.
Tap anywhere in the list to provide additional values for a measurement position. A pop-up window is displayed:
Field Descriptions
Field
Description
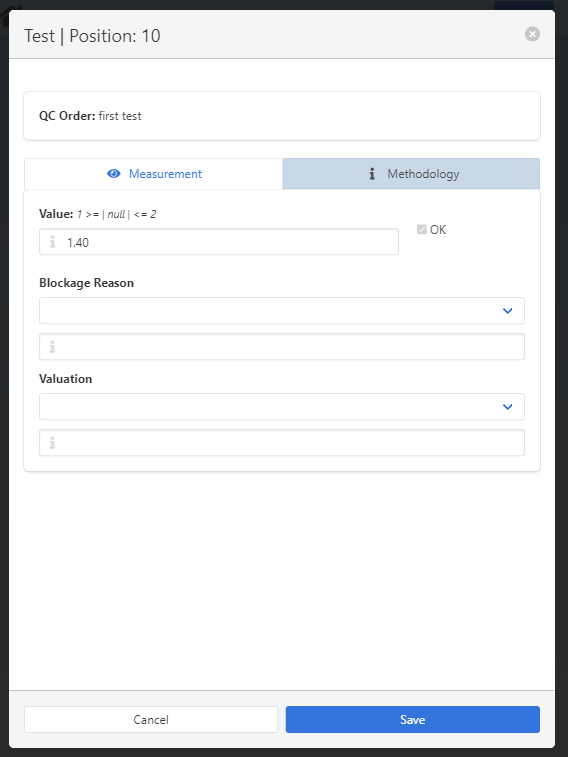
QC Order
Name of the QC Order
Measurement tab
Value
Value measured during the test. If the value was added in the list view, it automatically appears in this pop-up window.
OK: Check box is ticked if the measurement falls between the specified minimum-maximum values. Only for information.
Blockage Reason
Dropdown of blockage reason. An additional informational field is provided under the dropdown.
Valuation
Dropdown of valuation reasons to select from. An additional informational field is provided under the dropdown.
Save
Tap the button to update the sample. After updating, the released samples will not be visible in the list. On desktop you can press Enter, alternatively.
Cancel
Close the pop-up window without changes.
Methodology tab
The tab is only for information purposes and displays the long description of the sample.